

May 27, 2008
May 22, 2008
Illuminated Fish


This has been an idea that I have wanted to try for a long time. I used an artist frame, twinkle lights and a batik scarf that I painted over 10 years ago! It is easy to do this idea with cloth or paper that is transparent. With the use of a staple gun it can be finished in minutes.
May 19, 2008
Box Series


 The materials that I used for this project are cigar boxes, calendar pages, tissue paper, stickers, Golden Gel Medium, gold foil and a heat iron. Next time I might gesso the surface but the wood color coming through is very interesting. To hang these pieces there is a hole drilled into the back.
May 18, 2008

May 16, 2008

May 14, 2008


May 10, 2008
By The Sea

My 76 unbound chunky book pages are complete and in the mail to Victoria BC. The theme was By The Sea and I completed most of it using a computer. Although some glitter glue, crown stamp, and ribbon are great to add some more dimension to a piece. In return all of the artists will get 76 unbound pages returned to them in the mail to either bind, frame or anything else that strikes their fancy.
April 24, 2008

April 2, 2008
Great minds think alike.

This is a letter from the craft store. The base is a copper paint with a crackle medium and a top coat of antique white. It is then stamped with pink ink and the ribbons are tied on with a quote added for good measure!
March 27, 2008

Spring
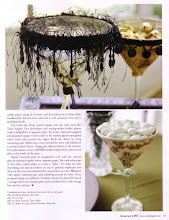
.JPG) The glasses are made with antiqued German book pages glued onto the glass with a Gel medium. Then hot glue the fringe to the outer edge and seal the outside papers with another coat of Gel. This style can be used on a number of different glass shapes and is really fun to see how it turns out.
The glasses are made with antiqued German book pages glued onto the glass with a Gel medium. Then hot glue the fringe to the outer edge and seal the outside papers with another coat of Gel. This style can be used on a number of different glass shapes and is really fun to see how it turns out.March 24, 2008
Note Book

These projects were made from things that can be found at Target, Pier 1 or a craft store. One is a note book that has a collage on the outside. The second is a martini glass that has antique paper, fringe and bows on it. And the third is a glass bottle that has paper, a French perfume sticker, ribbon, copper grass, and a small velum circle with a wax stamp on it. It is interesting to use 3 different mediums and the same materials and see how the creativity from one piece flows to the next.
March 23, 2008
Spring
 Spring is here! As an addition I placed a butterfly in the petals of the flower. It is clip art from a CD and the text is a quote from Goethe which reads: "Nothing is worth more than this day." Very true!
March 14, 2008


March 10, 2008
Today

This seems like a good time to kick off the project of the week idea. Above is a gift for my Grandmother and it is really fun and easy. It is all about the layering of materials. You will need a square block of wood, decorative papers, flower shapes, iconic woman, crown add on, glass stones, copper paint, ribbon, glue brush, paint brush, glue and a drill.
The first step is to glue the base paper down on the front and back and trim out. Paint the sides with copper paint and allow to dry. Add the flower shapes, the woman and the saying at one time. I put the glass stones on with a wood glue that dries clear. For stability it is key to find stones that are flat on one side. This piece can be put on the wall or resting on a counter. Okay down to the fun part...the drilling! It is key to make the hole large enough to be able to get the ribbon through. Once you tie the ribbon on and cut the extra off sign the back and you are finished! For a small project like this I gather up all my materials into a project box so that I can get to it anytime and all the pieces are together and ready to go!
March 6, 2008
Paperclips

This is a fun project using things that you have at home. I love how they are all different and colorful!
February 27, 2008


Paper Clips

While out in the office supply store I saw these huge paper clips and thought it would be fun to embellish them with some ribbon from another project. On the other hand the smaller paper clips would be fun to work with too and could go into a snail mail letter without any worry! These are super fast and fun and it is great to mail them out to family and friends.
Clipboard

A clipboard is a very useful item to keep track of loose bits. Here is one that has been upgraded to make it a little sassier. You will need a clipboard, fun papers, ribbon, copper tape, glue and a sharp knife and spray paint if you want to change the finish of the silver clip part. Start by spray painting the clip and let it dry. For this piece I used a satin copper spray. Put on the decorative paper to the front and back and cut off the extra as the edges will be wrapped in the copper foil. Tie on the matching ribbons and it is finished!
Subscribe to:
Comments (Atom)


