

March 27, 2008
Spring
.JPG) The glasses are made with antiqued German book pages glued onto the glass with a Gel medium. Then hot glue the fringe to the outer edge and seal the outside papers with another coat of Gel. This style can be used on a number of different glass shapes and is really fun to see how it turns out.
The glasses are made with antiqued German book pages glued onto the glass with a Gel medium. Then hot glue the fringe to the outer edge and seal the outside papers with another coat of Gel. This style can be used on a number of different glass shapes and is really fun to see how it turns out.March 24, 2008
Note Book

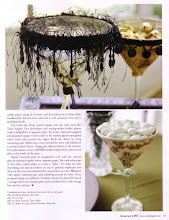
These projects were made from things that can be found at Target, Pier 1 or a craft store. One is a note book that has a collage on the outside. The second is a martini glass that has antique paper, fringe and bows on it. And the third is a glass bottle that has paper, a French perfume sticker, ribbon, copper grass, and a small velum circle with a wax stamp on it. It is interesting to use 3 different mediums and the same materials and see how the creativity from one piece flows to the next.
March 23, 2008
Spring
 Spring is here! As an addition I placed a butterfly in the petals of the flower. It is clip art from a CD and the text is a quote from Goethe which reads: "Nothing is worth more than this day." Very true!
March 14, 2008


March 10, 2008
Today

This seems like a good time to kick off the project of the week idea. Above is a gift for my Grandmother and it is really fun and easy. It is all about the layering of materials. You will need a square block of wood, decorative papers, flower shapes, iconic woman, crown add on, glass stones, copper paint, ribbon, glue brush, paint brush, glue and a drill.
The first step is to glue the base paper down on the front and back and trim out. Paint the sides with copper paint and allow to dry. Add the flower shapes, the woman and the saying at one time. I put the glass stones on with a wood glue that dries clear. For stability it is key to find stones that are flat on one side. This piece can be put on the wall or resting on a counter. Okay down to the fun part...the drilling! It is key to make the hole large enough to be able to get the ribbon through. Once you tie the ribbon on and cut the extra off sign the back and you are finished! For a small project like this I gather up all my materials into a project box so that I can get to it anytime and all the pieces are together and ready to go!
March 6, 2008
Paperclips

This is a fun project using things that you have at home. I love how they are all different and colorful!
Subscribe to:
Comments (Atom)


